
Modify Normal.dotm
Every document starts with the template Normal.dotm—even if users don’t realize it. This template includes default styles and behaviors that determine the basic look of each new document. You might modify this template to avoid resetting things every time you create a document. But if Normal.dotm is damaged or moved, Word will create a new version the next time you launch Word, and it won’t include your customizations. The same thing might happen when you upgrade to the next version of Office.
If you work alone, making a few changes to Normal.dotm is harmless—but be sure to save a copy someplace so you can reclaim it if the worst happens.
Use spaces or tabs to indent
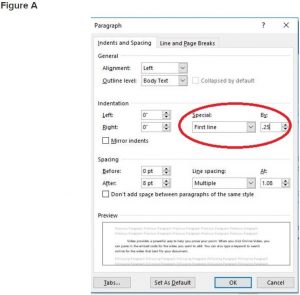
When typing a simple document, some of you might insert a tab or a few spaces to indent the first line of each paragraph. The practice is harmless until you modify the document in some way. You could end up with an out-of-place space or tab. More likely, you’ll end up with lots of displaced text. It’s not a big deal in a short document, but in a long document that requires a lot of editing, those tabs and spaces in the wrong places can drive you nuts. Instead, set a default indent as follows:
- Click the Home tab.
- Click the Dialog launcher for the Paragraph group.
- From the Special dropdown in the Indention section, choose First Line.
- Enter an indent measurement in the By control (Figure A).
- Click OK
Let Word decide
Word is full of defaults that are adequate in most circumstances. However, those defaults can be annoying if you’re constantly having to reset options. Fortunately, Word lets you take the wheel if you want to. Change those defaults and eliminate those tedious steps you take.
Live with distractions
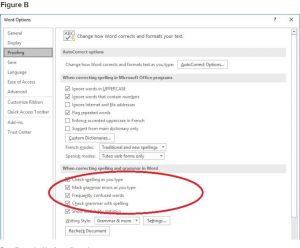
Word tries its best to help you as you’re working. For instance, as you type, Word highlights typos, grammatical errors, and formatting inconsistencies. Some users find interactive features annoying. If you like to type without all that screen noise, disable these features:
- Click the File tab and choose Options.
- Select Proofing in the left pane.
- In the When Correcting Grammar And Spelling In Word section, uncheck the first four options (Figure B).
- Check Advanced in the left pane.
- In the Editing Options section, uncheck the Mark Formatting Inconsistencies option for the Keep Track Of Formatting option (Figure C).
- Click OK.
Just bear in mind that disabling these features can make you more vulnerable to mistakes; it’s an all or nothing choice.
Use Format Painter as a replacement for styles
If you find yourself using Format Painter a lot, stop. Instead, create a custom style or modify one of Word’s built-in styles accordingly. Formats applied directly (manually) have a way of causing problems because they take precedence over styles. Later, when applying a style doesn’t have the desired effect, you might not know why.
Format Painter isn’t the only culprit though—any direct formatting has the potential to cause problems. Always use a style when possible.
Use two returns to end a paragraph
When using block style for content, users often hit Enter twice at the end of the paragraph to add a bit of white space between the paragraphs. But this creates havoc when you reorganize things. Instead, press Enter at the end of the paragraph only once and change the paragraph spacing or modify the style to add the desired space. Word handles this for you automatically in newer versions, so this habit isn’t as problematic as it once was.
While we’re on the subject of hard returns, I recommend that you change the top margin rather than using Enter to space down to allow for fixed content such as letterhead and logos. The returns are less menacing in this spot, but in general, using Enter to add empty space is a bad idea.
Use Enter to force content to the next page
I thought users had stopped doing this until I reviewed a document from a reader; sure enough, it was full of forced lines at the bottom of several pages. When others opened her document, things weren’t where she put them! For better or worse, a user’s default printer has some control over a Word document. If another system must rework fonts or spacing on the fly, it might look different. Although frustrating, this is one of the easiest problems to fix.
The simplest fix is to insert a page break. Better yet, apply a style. Even better, attach the break to the last or first paragraph. Word automatically inserts new pages as you insert text and graphics. You don’t need to do a thing but add the content. However, you can manipulate where a page breaks yourself, if you want to. Simply choose Break from the Insert menu and click OK. Page Break is the default setting.
For the most part, you should avoid inserting page breaks and let Word take care of them for you. Manual page breaks quickly become a nuisance. As you update your document by inserting or deleting content you usually have to fix the manual page breaks.
However, there are times when you might want to force a page break before a specific paragraph. By associating the break with the paragraph, you can insert and delete all you like. To force a page break before a specific paragraph do the following:
- Click inside the paragraph in question.
- Choose Paragraph from the Format menu.
- Click the Line and Page Breaks tab.
- Select the Page Break Before option, and click OK.
In Word 2007, open the Paragraph dialog box by clicking the dropdown arrow at the bottom-right corner of the Paragraph group on the Home ribbon. You can add and delete content before the paragraph or even move the paragraph and Word will still force a page break before that paragraph.
Source TechRepublic and Your Technology Partner
Recent Comments