
Word does a good job of assuming how the average user works, but some of Word’s default settings can be annoying and inefficient. Some users don’t know they can permanently change these settings, so they continue to reset them for each new document or just struggle along. Users should consider resetting the following defaults to work more productively. Of course, there are more defaults to set; feel free to share your suggestions .
Line spacing
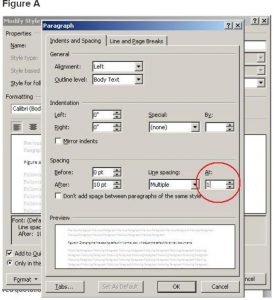
The default line spacing setting in Word 2007 and 2010 is 1.15, not 1, as it is in 2003. Microsoft believes 1.15 is more readable online. If you’re not generating Web content, adjust the style(s) you use in Word’s template (Normal.dotx), as follows:
1. Click the Home tab.
2. Right-click Normal in the Styles Quick gallery and choose Modify.
3. Choose Paragraph from the Format list.
4. In the Spacing section, change the At setting from 1.15 to 1, as shown in Figure A.
5. Click OK.
6. Check the New Documents Based On This Template option.
7. Click OK.
Smart quotes
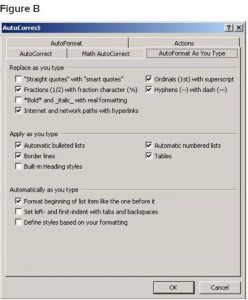
If you generate Web content or other published material, you probably have to undo Word’s smart quotes in favor of straight quotes. You can do so quickly enough by pressing [Ctrl]+Z, but that becomes tedious after a while and you might forget. If you use straight quotes more than smart quotes, disable smart quotes as follows:
1. Click the File menu and choose Options under Help. In Word 2007, click the Office button and click Word Options. In Word 2003, choose Auto Correct Options from the Tools menu and skip to step 4.
2. Choose Proofing in the left pane.
3. Click AutoCorrect Options in the AutoCorrect Options section.
4. Click the AutoFormat As You Type tab.
5. Deselect the Straight Quotes With Smart Quotes option in the Replace As You Type section, shown in Figure B.
6. Click OK.
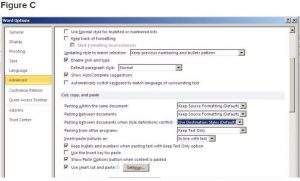
Word’s paste special feature retains the source formatting. If you’re pasting from foreign sources, you probably reformat it once it’s in your Word document. If you do this a lot, change the Paste Special default as follows:
1. Click the File tab and choose Options. In Word 2007, click the Office button and then click Word Options.
2. Select Advanced in the left pane.
3. In the Cut, Copy, and Paste section, choose Use Destination Styles from the Pasting Between Documents When Style Definitions Conflict drop-down.
4. Choose Keep Text Only from the Pasting From Other Programs drop-down, as shown in Figure C.
5. Click OK
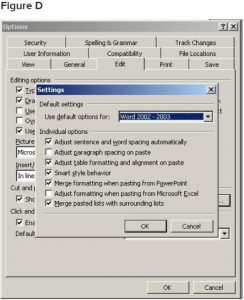
This feature is significantly different in Word 2003. From the Tools menu, choose Options, and click the Edit tab. In the Cut And Paste section, click the Settings button to display the options shown in Figure D.
File location
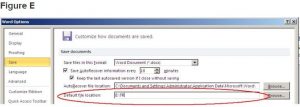
Word saves your documents in My Documents. If you find yourself resetting the save location a lot, reset the default as follows:
1. Click the File tab and choose Options. In Word 2007, click the Office button and then click the Word Options button. In Word 2003, choose Options from the Tools menu.
2. Select Save in the left pane. In Word 2003, click the File Locations tab.
3. Specify the new folder in the Default File Location field shown in Figure E. Or click Browse and locate it that way. In Word 2003, highlight the Documents item and click Modify. Use the Modify Location dialog to specify the new folder and click OK.
4. Click OK.
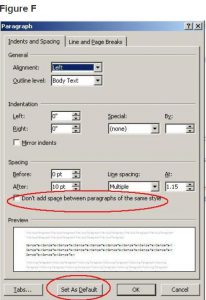
Spacing between paragraphs
When you press [Enter], Word increases the line spacing to add a bit more white space between paragraphs. This extra space isn’t the same as a blank line, so you can’t delete it by pressing Backspace. To eliminate this extra spacing, do the following:
1. Click the Home tab. In Word 2003, select Paragraph from the Format menu.
2. Click the Paragraph group’s dialog launcher (the small arrow in the lower-right corner). In Word 2003, click the Indents And Spacing tab.
3. Check the Don’t Add Space Between Paragraphs Of The Same Style option.
4. Click Set As Default, as shown in Figure F. (Not available in Word 2003, but you can change this format for the current document.)
5. Click OK.
Mini toolbar
When you select text, Word displays the mini toolbar, which hosts several formatting options. Even though it’s dimmed, it still annoys some users. You can press [Esc] to hide it or you can permanently disable it, as follows:
1. Click the File menu and choose Options. In Word 2007, click the Office button and then click Word Options.
2. Choose General in the left pane (if necessary).
3. In the User Interface Options section, uncheck the Show Mini Toolbar On Selection option, shown in Figure G.
4. Click OK.

Drawing canvas
Word’s drawing canvas is a distinct layer for drawing. Objects placed in a canvas have an absolute position and remain together as a group. Most users find the canvas layer difficult to work with and frankly, most users don’t need it. If you’re still using Word 2003, disable the canvas layer as follows:
1. From the Tools menu, choose Options.
2. Click the General tab.
3. Uncheck Automatically Create Drawing Canvas When Inserting AutoShapes in the General Options section.
4. Click OK.
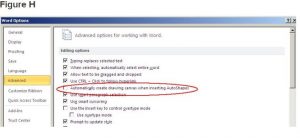
Word 2007 and 2010 disables the canvas layer by default. If you happen to be working with the drawing canvas enabled, disable it as follows:
1. Click the File menu and then choose Options. In Word 2007, click the Office button and then click Word Options.
2. In the left pane, choose Advanced.
3. In the Editing section, uncheck the Automatically Create Drawing Canvas When Inserting AutoShapes option, shown in Figure H.
4. Click OK.
Normal.dotx
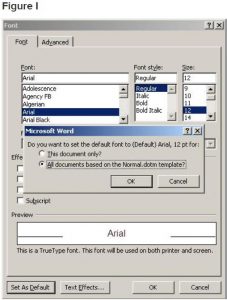
Word bases new documents on Normal.dotx, but the template’s settings might not fit your needs. If you have just a few changes, customize Normal.dotx. A common customization is to change the font and size. To make the change at the template level, do the following:
1. Open a new document and click the Home tab.
2. Click the Font group’s dialog launcher (the arrow in the bottom-right corner). In Word 2003, choose Font from the Format menu.
3. Make the necessary font changes. For instance, you might choose Arial, 12.
4. Before closing the dialog, click the Set As Default button. In Word 2003, click Default.
5. In the resulting confirmation dialog, select the option to set the default for all documents based on the Normal template, as shown in Figure I.
6. Click OK twice.
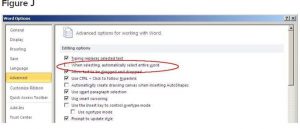
Word selection
When you select part of a word and then part of the next, Word selects the whole word for you — whether you meant to or not. To disable this selection option, do the following:
1. Click the File tab and choose Options. In Word 2007, click the Office button and then click Word Options. In Word 2003, choose Options from the Tools menu.
2. Choose Advanced in the left pane. In Word 2003, click the Edit tab.
3. In the Editing Options section, deselect the When Selecting, Automatically Select Entire Word option, as shown in Figure J.
4. Click OK.
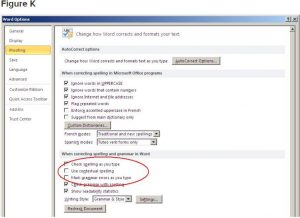
Spelling, grammar, and formatting
Word identifies misspelled words, grammatical errors, and formatting inconsistencies, as you type:
- A red line indicates a word not found in the dictionary (possibly misspelled).
- A green line indicates a possible grammatical error.
- A wavy blue line indicates an inconsistent format.
It is recommended that you get used to the display and not disable these features — they’re a helpful indication that something might be wrong. On the other hand, if you find them distracting, you can disable them. To disable the red and green lines, do the following:
1. Click the File tab and then choose Options. In Word 2007, click the Office button and then click Word Options. In Word 2003, choose Options from the Tools menu.
2. Select Proofing in the left pane. In Word 2003, click the Spelling & Grammar tab.
3. In the When Correcting Grammar and Spelling In Word section, uncheck the first three options: Check Spelling As You Type, Use Contextual Spelling, and Mark Grammar Errors As You Type, as shown in Figure K. (There’s no contextual spelling option in Word 2003.)
4. Click OK.
Source: Tech Republic and Your Technology Partner
Recent Comments